Examples in Python and Rust
This example guide describes the use of linkspace in Python and Rust. It is more detailed than the quick-guide. The program sources are in the example directories:
examples-python
examples-rust
examples-rust-lamp
They show opening the linkspace database, the creation of data- and linkpoint and the display of their content.
The examples are numbered
1 is for the database file opening and comments on using the `lk` linkspace command line tool
2 described and shows the creation of simple data and several different creation of linkpointsd
3 continues with identities and key needed for keypoints and how keys and points can be written/read to/from disk.
4 opens the files to recreate keys and keypoints, both from key files as from serialization and queries results
5 and a program to serialize with a built-in byte change between serialize and deserialize to show an error.
6 is finally on a simple set of programmable queries examples
Plus a set of three lamp programs for switching on a lamp and monitoring/logging it.
The examples provide a way of getting acquainted with Linkspace. The program logic is kept as simple as possible. Variable names are as self-explaning as possible (and sometime long). Learn to fill a database with different points using the shown programs. Then learn to use the `lk` tool to dive into the database content (see quick guide command line instruction 'lk'). Gradually you will gain understanding what Linkspace function calls are doing and how to design a program yourself.
You you are free to copy, experiment, modify and reuse parts of these examples.
Why Rust (and Python)
Linkspace is written in Rust, a memory safer, modern programming language. It is as fast in execution speed as forty year old C, but without the C memory problems. However, Python is for many easier to start with. So we provide the examples for both programming languages.
In the ffi (foreign file format) directory there is, next to linkspace-py for the Python environment, also a Javascript directory linkspace-js. Javascript is not discussed here, but for those who want to make html environment, Javascript provide an other programming environment.
Python is an interpreter, and more relaxed. Python function call parameter flexible. For small test and example program the slow execution time of an interpeter isn't an issue, but for larger application it is.
Rust is compiled and can execute very fast. But Rust is very strict and requires a lot of error handling. Rust prescribres strict typing, all function call parameters to be named in order as defined, etc. You will see this in the examples.
The Python set of examples are indepedent programs. The Rust set is a main program where each example is a function call. In Rust there is a src directory and a cargo.toml file. If you are not working in an IDE (integrated development environment) you must start a Rust program with `cargo run`, it will then compile the program and execute it. Cargo is the package manager for Rust. With it you can also create a binary/executable program with `cargo install`, etc.
First time Rust users, don't be surprised by oddities of Rust. The LkResult, the Ok(()), and in particular the ? all become clear in due time. LkResult is a Rust structure <T,LkError> for error handling and the reason why the function is closed with the Ok(()). More troublesome for initial Rust users are the ? marks. It is a Rust handy feature replacing the .unwrap() function to get the type T from the Result<T,Error>. When programming you will gradually get used to them. Your programming environment (compiler) will provide the needed feedback. But even then, don't worry to use some trial and error.
Let's focus back on Linkspace.
Example 1 Linkspace database and the use of the 'lk' command line tool
You can open a linkspace database using hard-coding, using the environment variable LKDB, program arguments arg or the fallback $HOME/lkdb. In the examples /tmp/lkdb is assumed.
In Python you can use try three possible input for name database:
from ENV, from program argv parameter, from input
from ENV, then use this lkdb, but check if ok, if not change it
if ENV is empty, then check if there are program arguments,
if program arg, use this lkdb, but check if ok, if not change it
finally from program argv.
The problem with experimenting is that the database be created in several ways and also can exist, and you might lose track where your points get stored. So below, a function is provided to guide you a little more. as with all examples, coding logic is not optimized, but extensive to enable one to follow what is done in the code
Given the lkdb name, we can open it with lks_open. With lks_info you can output the location of the database.
In Rust, where example 1 is called main.rs, we kept is simple: hardcode /tmp/lkdb. But to get the name from lks_info immediately a Rust issue pops up. The result f from the lks_open call is a Result<LkSystem, Error> unwrapped with the ? to LkSystem. But to get to the lks.name you need to extract LksInfo from LkSystem. This is done with Some(&f) and then unwrap the result. Welcome to Rust.
a more detailed explanation of what lks_open does and usage of lks_open when experimenting:

lks: LkSystem = lks_open() opens as lks an empty LkSystem (or Linkspace database).

To start with an empty lkdb in the /tmp directory, type at command line the following Unix piped command string:

export LKDB=/tmp/lkdb | rm -r /tmp/lkdb | lk init

That is, first set the LKDB environment variable, dan remove the old database and create an empty new one.

If no environment LKDB is set, and dir = None, the $HOME/lkdb is used.

If the program puts its output in /tmp/lkdb but the `lk scan ... ` commands work on the $HOME database, not on the /tmp/lkdb

The proper `lk` command could use the directory flag `-d ...` as in

lk -d /tmp/lkdb scan --bare --private rw -m log-desc | lk f
   where

-d /tmp/lkdb set the directory where the database of interest is located

-m log-desc stands for scan-mode log-time descending, other options [space|log|hash]-[asc/desc]

-b or --bare to read all datapoints

--private to real also points in [#:0

Instead of --private, you can also set the environment variable: `export LK_PRIVATE=rw` or `r`.
Setting private is needed as points in the local group [#:0] are otherwise not shown.
In the Rust program also a Space is defined. A Space is the combination of domain:group:path. Domain and path are strings, but group identifiers are 32 bytes.
There exists a small problem, the default for domain and path are empty and for public group [#:pub]. But an initialization of all zero for the group (32 times a zero byte) results by definition in the local group [#:0]. But you want as default group the public group, not the local group. The local group has limitation, similar to localhost. So in the example in Rust we used in main.rs the result van the lke_group().
Normally lke_group() takes the LKE_GROUP environment variable, else it takes [#:pub], just what we wanted.
The examples of Space start in example 2.
Example 2 Create and print points
The different usage of Space is continued in example 2.
Three examples regarding groups are illustrated. The LKE_GROUP environment parameter should be set before launch, otherwise it is default [#:pub]
For the program below, set in the environment a name you choose, e.g. : export LKE_GROUP="[+:Linkspacer]". In the output you will see the practically unreadable group id as Byte32 or a 43 character format [b:….].
The private or local group is all zero's : Bytes32([0]*32) or [b:AAAA…AA"], as A is first ASCII[0]. After lka_encode the local group is written as groupname [#:0] and
the default public group [b:j0SWgDvDOLIEny0eEoWgDKWyxpmRmavdvbtXfQYz2bE] becomes (after lka_encode) [#:pub]
The private/local and public group also have a constant: PRIVATE and PUBLIC.
Have a look at the database with `lk scan -b -m log-desc –private rw | lk f`
In this example first one datapoint is created and then the creation and printout of 3 (in Python) and 6 (in Rust) different ways/different linkpoints are illustrated.
However if you look in the database with `lk scan -b -m log-desc –private rw | lk f`
Actually you will see that a first datapoint is created in a linkpoint database for generating the hash for the public group. This datapoint hash then become the groupID for public.
A point.hash, a groupID and a pubkey are all Bytes32. The extremely long, for human hardly readable identifier are also written in a format better recognisable for humans as e.g.: [#:pub], [#:0], [+:test]
Whereas a datapoint only has its identifiers, its hash and data, a linkpoint has next to its space also the possbility to have links to other points. The function call to create a linkpoint has three parameters: the space, its data and its links. The links are an array with zero or more tag+hash elements. The tag is a 16 char string, the hash a 32 byte. In the example we use the hash of a data point as the hash and link the linkpoint to that datapoint. A small issue: a link tag is max 16 char string, "toggle-in-datapoint" is too long, but calling the tag `tag` goes fine.
Example 3 identities, keys and keypoints.
Keypoints, now it becomes more serious. Before keypoints are created we need keys and keys are created for identities.
An identity is a username and password. But the password gets complicated as there are two different password.
Let first explain how keys are created.
There are three ways to get or generate a key
1 The first, lki_generate() call, creates a random key, while you can store the secret part securely with a password
2 The second generate an adhoc ID with a password and store the secret part with the same or other password
3 The third, lkc_id_open() call, produces each time the same key for the same name and secret password, but where the several different users with the same name each get their own unique internal name. The third option is more complex and less used, and therefore not shown here.
With (1) lki_generate() you get everytime a different key. With (2) lki_adhoc(space, password) you get, in the same space, the same key with the same password. Notice that with an adhoc with empty password, every one can get that key, not a save option.
We will come back on keys in the next example on key validation.
Given a key we can now created keypoints. In the examples the creation of several keypoints are shown, first the generated keys and secondly for adhoc keys. The adhoc ones need a password, in general the password from a login username/password combination.
Once a key is created, either by generate or adhoc, we get a pubkey and private key. The private key is never shown, but only the encrypted version and this enckey also has a password, in fact a second password, causing some confusion. A predictable step is to use for both passwords the same, but that is no so sensible.
Use the username/password for the adhoc key, applicable to create the same key (for the same group) if needed. And use another encryption password for the enckey.
In the point field there is the point.pubkey and a point.signature. The last one is used to (automatically) check the validation of keypoints.
Finally this example shows how the pubkey and the signature can be export to a file. That file can latter be used to create and/or validate points as we will show in the next example.
As we are using exports to files, the example is ended with the serialization of a point, i.e., the creation of a stream of bytes into a file. Latter on this file can be reread to re-create the points with a deserialize function call. That is for example 5.
Example 4 Key validaton
Example 4 relates directly to example 3 (3 is a 3a and 4 a 3b). It is a straight forward program showing that the pubkey from the file is the same as the pubkey stored within the encrypted key. Just as it should be.
Then, as we did the unsave trick of generating an adhoc key with the empty password, we were able to generate a pubkey that is the same as the pubkey we read from the pubkey file and that was generated in example 3 also with the same empty password. Don't use a blank or too easy password.
Finally we did it again, generating a pubkey with an empty password, however this time in another group. In that case the pubkey are not the same.
Example 5 Serialize points
The end of example 3 should has a keypoint was created and the serialized into a stream of bytes. That stream was filed in the /tmp directory. In this example 5 the file is read and the bytes are de-serialized into a point again. As in example 3 the key that was used to create the keypoint key from the adhoc call with the password.
Also here a pubkey after serialization was again check with the pubkey generated in example 3.
Finally in the Python version the results of a byte error in the byte stream is shown. Deserialization then lead to an error. In the Rust version another example of the lk_serialize call is shown: lk_serialize-ref. There the byte stream remains in the memory as a pbytes buffer.
Example 6 Queries
The examples show a few, almost too simple query options. Just scanning the database created in the previous examples. Those examples don't provide an active changing database usefull to demonstrate the use of the watch (and tap) function call. The lamp example is an example of three programs where the callback function as used with the wacht quary is illustrated.
Another usefull option is the use the `lk` command with in particular 'lk print-query' and similar command (see lk –help and lk print-query –help). lk-print-query is an advanced command with around 20 options and 20 statements providing the possibility to extract all kind of results from the database.
In real-life linkspace application expect to use the query command in programs to extract the current status of the linkspace database, export the results into a SQL database and use standard SQL commands. As in case of linkspace keypoints, one could state that each keypoint is a signed entry resulting in a SQL entry such that each SQL line/table row is a verified (signed) entry.
Examples Lamp, switch and logging
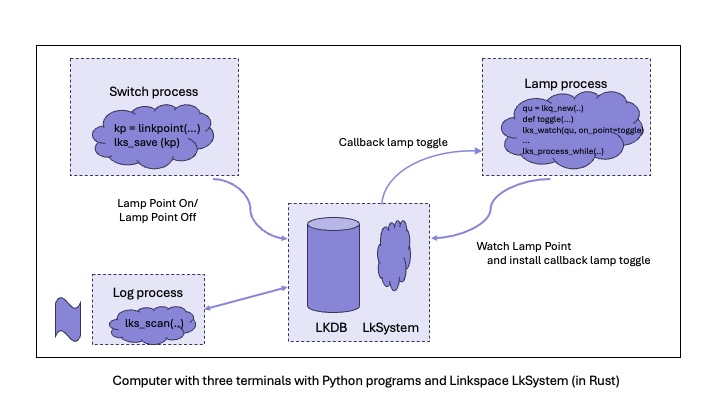
Start with the Switch program (a bin executable created by a Rust cargo call) to switch the lamp on-off. This is done with creating every time a point with a value 1 or 0. The next program, Lamp, will monitor such points to see if the lamp is turned on or off.
The lamp process monitors by a lks_watch with the callback function as one of its parameters. Once an update of the database with a lks_process_while takes place, LkSystem checks if a certain query condition is fulfilled.
In the example the lks_process_while is used as in the case of this simple program the program/thread had nothing else to do and can just wait till the condition is fulfilled.
To list all switch/lamp events one can scan with a query for points of interest. With the lks_scan call the LkSystem returns those points that satisfy the query. This is shown in the logging process. It is just a call that reports the list of all lamp on/off points in the database.